Code
Links
How does LiveView work?
In the previous lesson we got a taste of the LiveView’s magic! In this lesson we are going to see how LiveView really works and what happens behind the scenes when a user connects.
Let’s start with a simplified version of our dashboard, a view that renders only the Coinbase BTC-USD trades.
defmodule PoeticoinsWeb.CryptoDashboardLive do
  use PoeticoinsWeb, :live_view
  alias Poeticoins.Product

  def mount(_params, _session, socket) do
    IO.inspect(self(), label: "MOUNT")

    product = Product.new("coinbase", "BTC-USD")
    trade = Poeticoins.get_last_trade(product)

    # if socket.connected? do
    #   Poeticoins.subscribe_to_trades(product)
    # end

    socket = assign(socket, :trade, trade)
    {:ok, socket}
  end

  def render(assigns) do
    IO.inspect(self(), label: "RENDER")

    ~L"""
    <p><b>Product</b>:
      <%= @trade.product.exchange_name %> -
      <%= @trade.product.currency_pair %>
    </p>
    <p><b>Traded at</b>: <%= @trade.traded_at %></p>
    <p><b>Price</b>: <%= @trade.price %></p>
    <p><b>Volume</b>: <%= @trade.volume %></p>
    """
  end

  def handle_info({:new_trade, trade}, socket) do
    socket = assign(socket, :trade, trade)
    {:noreply, socket}
  end
end
By calling IO.inspect(self(), label: "...") in both mount/3 and render/1 we see when these callbacks are invoked and what is the process PID.
Let’s also temporarily comment the the Poeticoins.subscribe_to_trades(product) line in mount/3, in this way we’ll not get any new trade message, so we can better focus just on the first part of the life-cycle.
HTTP GET Request
Let’s start by doing a simple HTTP GET request to the live "/" route, with a tool like curl
$ curl -v "http://localhost:4000"

<!DOCTYPE html>
<html lang="en">

<head>
  <meta charset="UTF-8" content="DCcYcUw3OzEsC2ISVAkUTDkgHydfAkZrakIC6mpGVj7YyFXaQUTbis48" csrf-param="_csrf_token"
    method-param="_method" name="csrf-token">

  <script defer phx-track-static type="text/javascript" src="/js/app.js"></script>
</head>

<body>

  <div data-phx-main="true"
    data-phx-session="SFMyNTY..."
    data-phx-static="SFMyNTY..."
    data-phx-view="CryptoDashboardLive"
    id="phx-FlYt1v20d4jiJQBG">

    <main role="main" class="container">
      <p class="alert alert-info" role="alert" phx-click="lv:clear-flash" phx-value-key="info"></p>

      <p class="alert alert-danger" role="alert" phx-click="lv:clear-flash" phx-value-key="error"></p>

      <p><b>Product</b>:
        coinbase -
        BTC-USD
      </p>
      <p><b>Traded at</b>: 2021-01-01 18:05:18.124448Z</p>
      <p><b>Price</b>: 29315.3</p>
      <p><b>Volume</b>: 0.00673002</p>

    </main>
  </div>
</body>

</html>
We immediately notice that the app answers to our HTTP GET request with a fully rendered page! This means that we can support clients that do not necessarily run JavaScript, which makes LiveView also great for SEO.
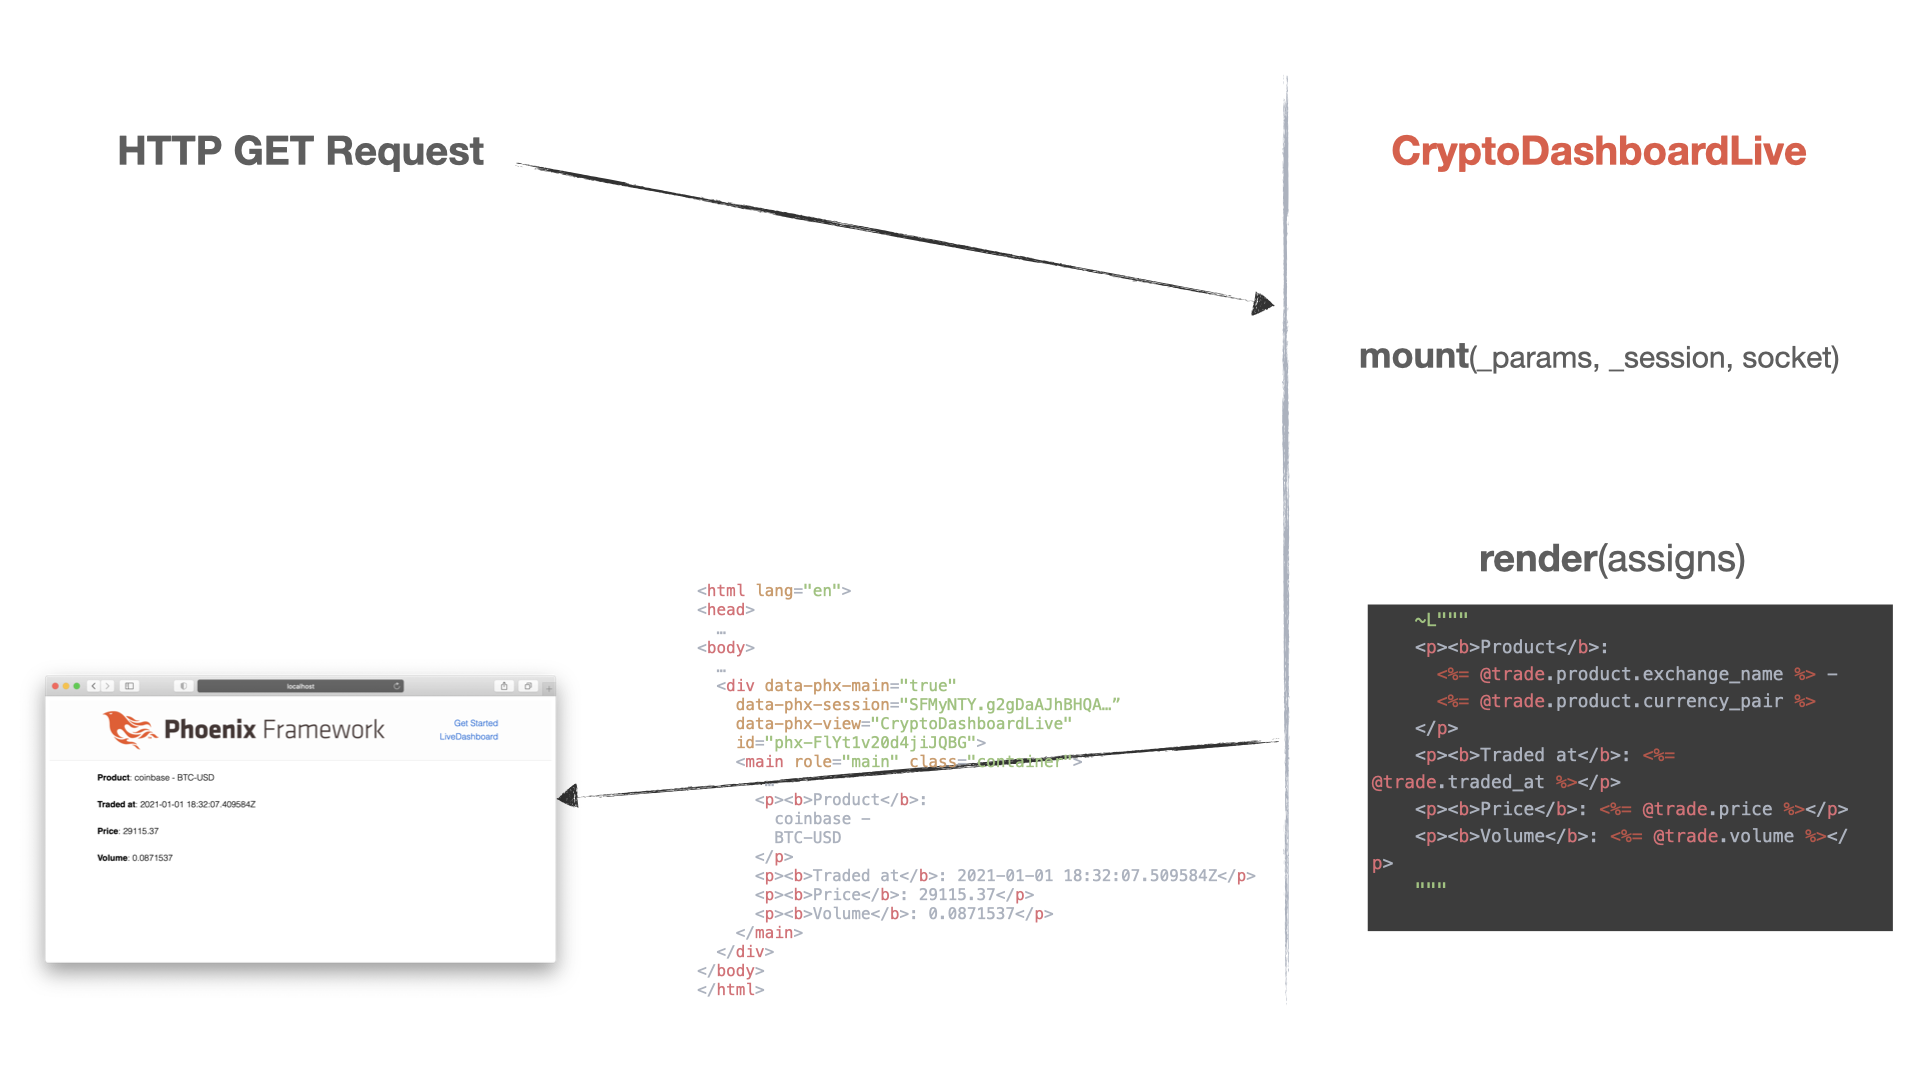
We made a normal HTTP GET request, mount/3 is called to initialize the data to be rendered, then render/1 returns the rendered content.
On the terminal we see that both mount/3 and render/1 are called.
[info] GET /
[debug] Processing with Phoenix.LiveView.Plug.Elixir.PoeticoinsWeb.CryptoDashboardLive/2
  Parameters: %{}
  Pipelines: [:browser]
MOUNT: #PID<0.462.0>
RENDER: #PID<0.462.0>
[info] Sent 200 in 40ms
Stateful LiveView process
By opening the http://localhost:4000 page with a browser, we see that mount/3 and render/1 are called two times.
MOUNT: #PID<0.599.0>
RENDER: #PID<0.599.0>
[info] Sent 200 in 2ms
[info] CONNECTED TO Phoenix.LiveView.Socket in 73µs
  Transport: :websocket
  Serializer: Phoenix.Socket.V2.JSONSerializer
  Parameters: %{"_csrf_token" => "GQclPRUJPykADko2AgcBKDMPSSRUN2YSUbsGs1lb-gzixvqfUlyv5nPw", "_mounts" => "0", "_track_static" => %{"0" => "http://localhost:4000/css/app.css", "1" => "http://localhost:4000/js/app.js"}, "vsn" => "2.0.0"}
MOUNT: #PID<0.612.0>
RENDER: #PID<0.612.0>
The first time is to answer to the HTTP GET request, with the fully rendered html page that we saw in the previous example. When the browser receives the HTML content, it loads the app.js application’s JS.
//app.js
import {Socket} from "phoenix"
import {LiveSocket} from "phoenix_live_view"

let csrfToken = document.querySelector("meta[name='csrf-token']").getAttribute("content")
let liveSocket = new LiveSocket("/live", Socket, {params: {_csrf_token: csrfToken}})

// connect if there are any LiveViews on the page
liveSocket.connect()
Running this script, the browser connects again to the server, this time opening a websocket connection, passing the csrf-token, rendered in the <meta> tag in the header. Once connected, the server starts a stateful LiveView process and calls for the second time mount/3 and render/1, pushing the new rendered page via the websocket connection.
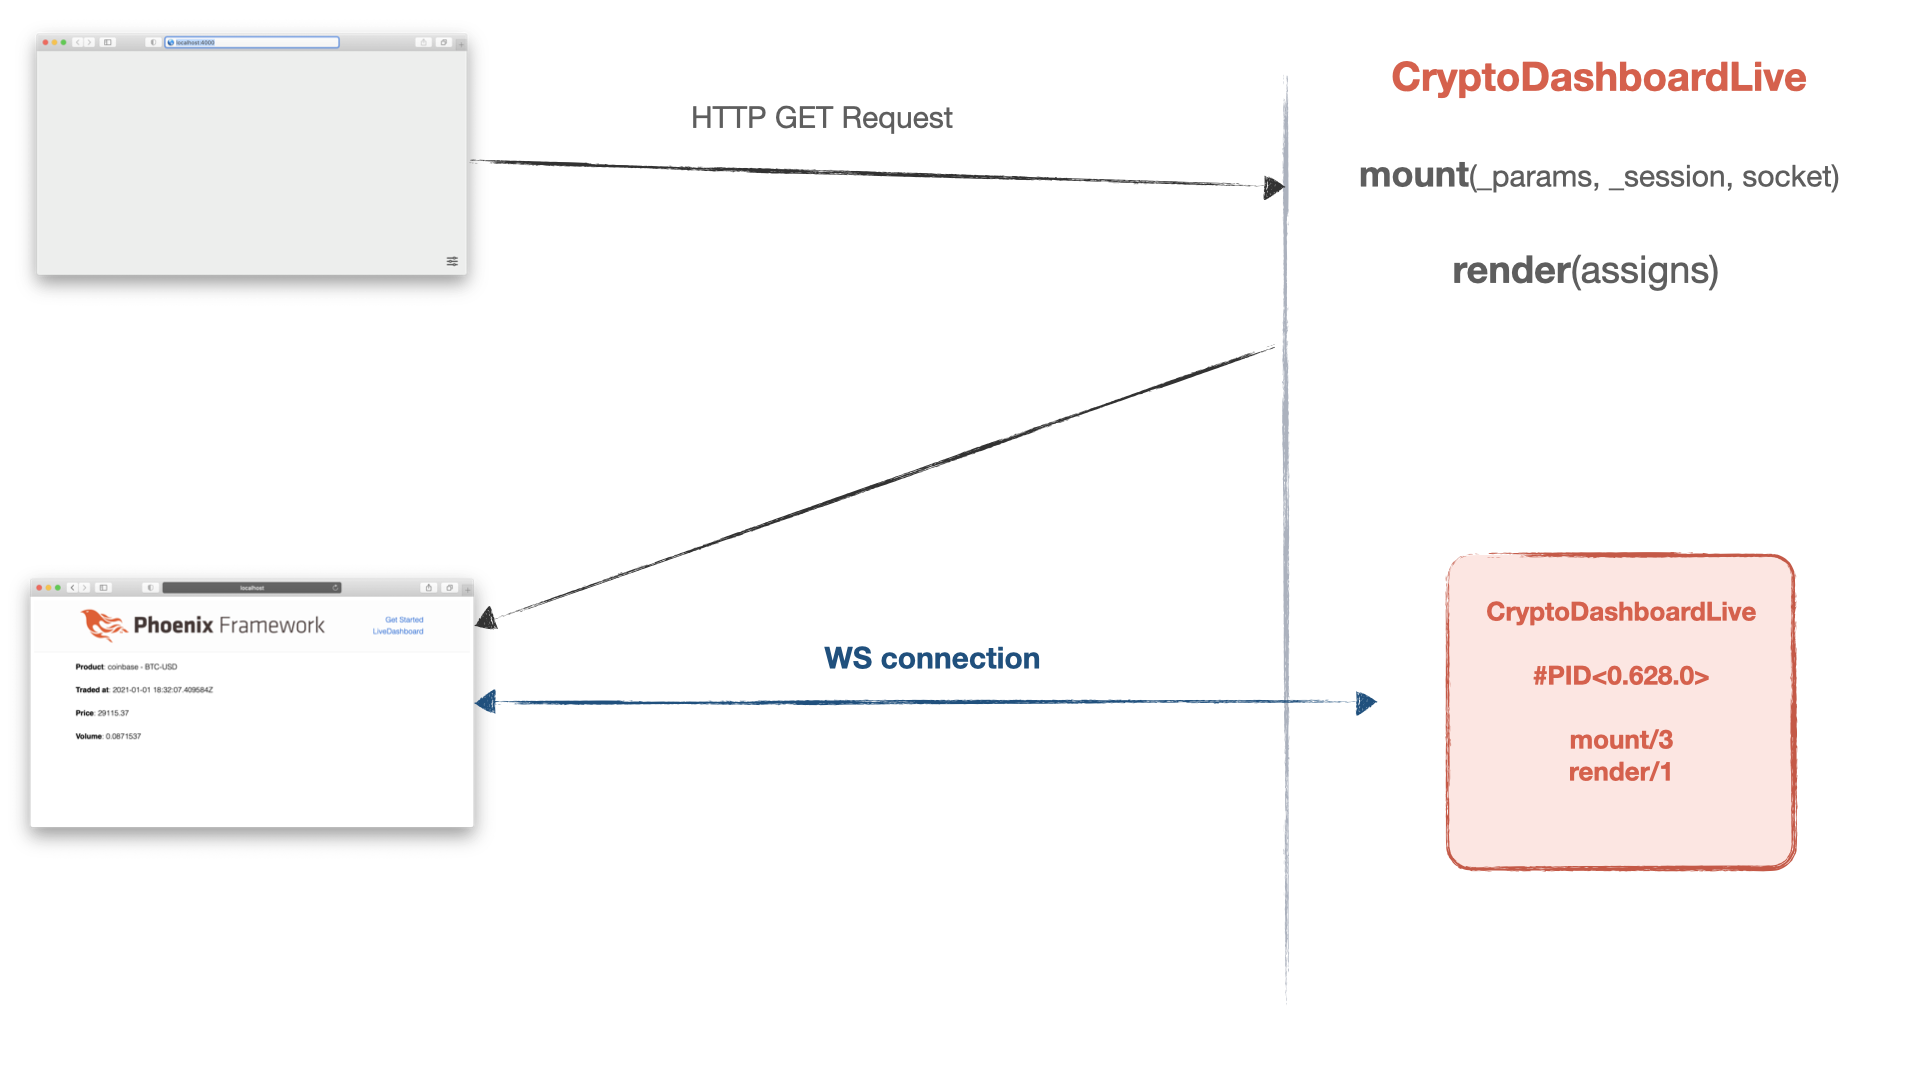
This new stateful LiveView process runs as long as the user stays connected, keeping the state in memory, listening to events from the browser and sending rendered changes to the browser, every time we update the socket.assigns values.
To better understand what happens over the WebSocket connection, we can use the browser inspector to see the exchanged messages.
In the inspector, going under the Network tab and refreshing the page, we see a list of requests
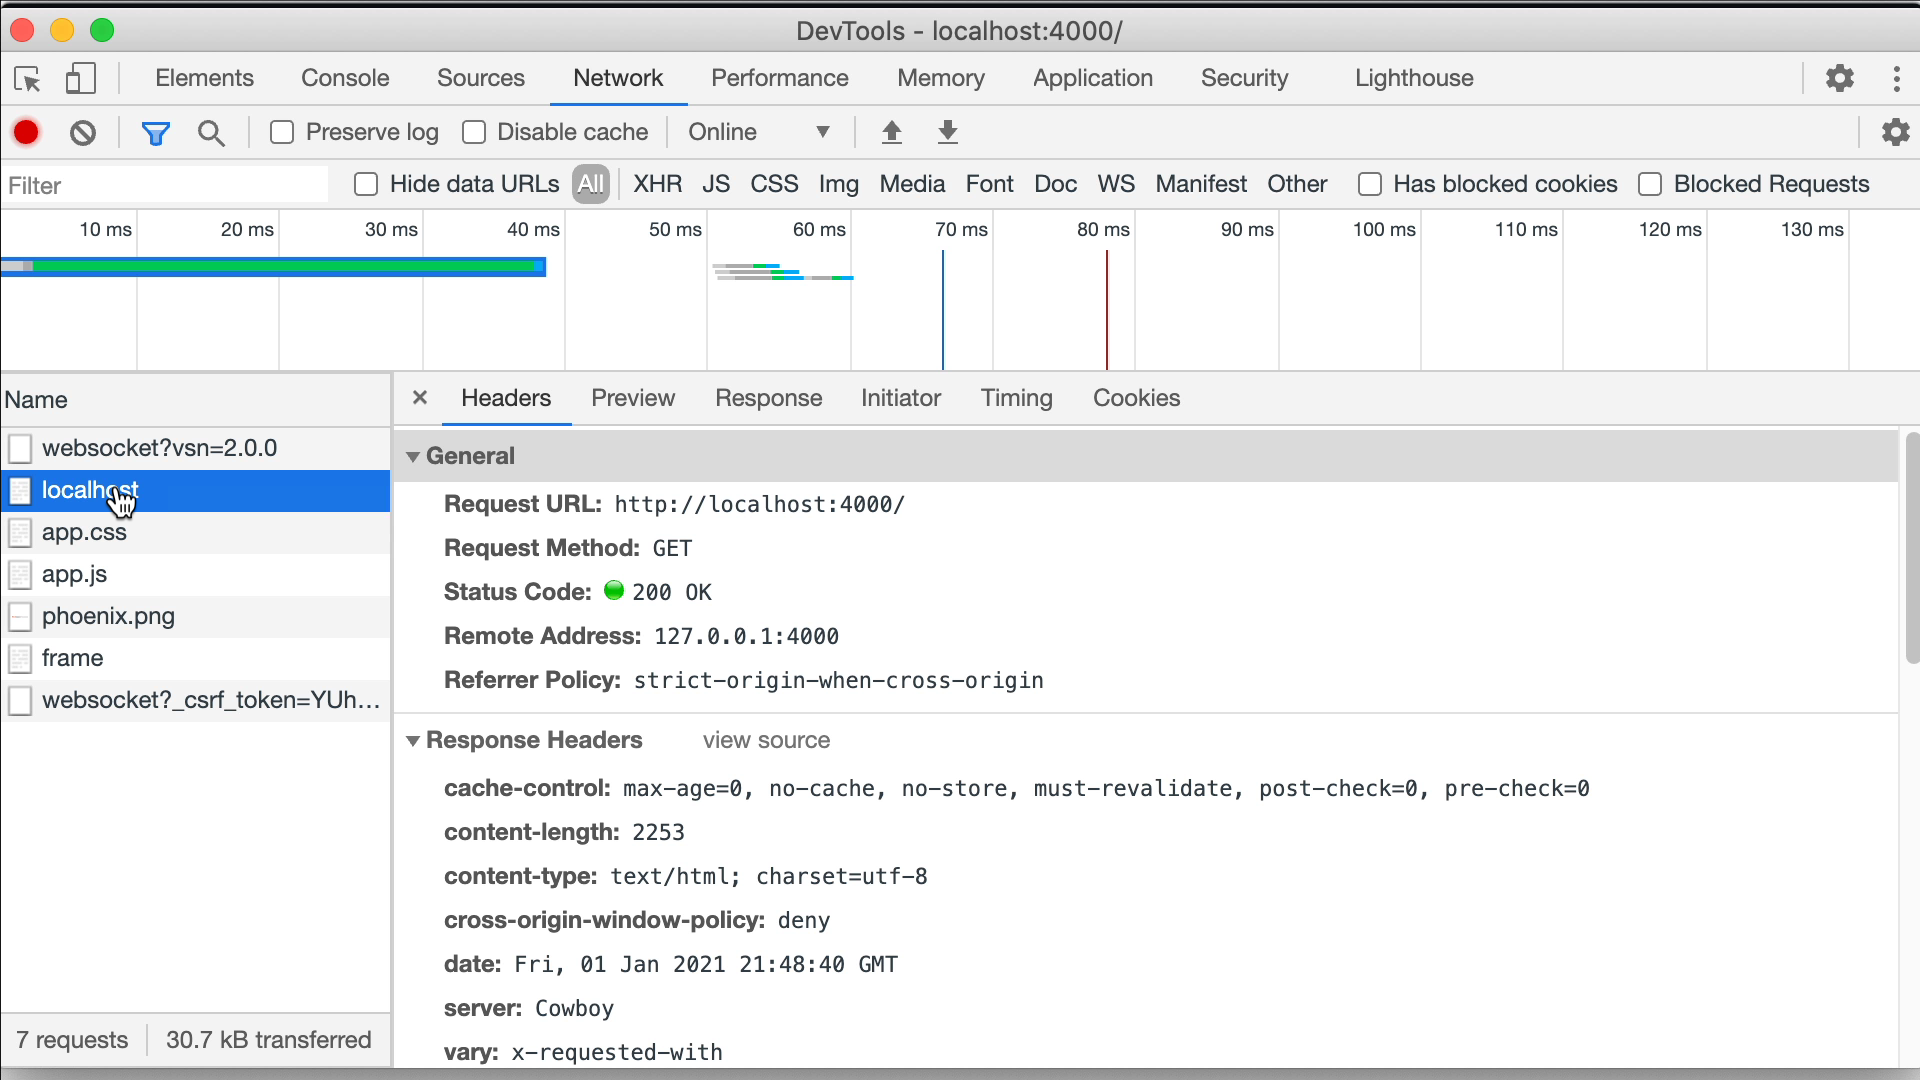
First we see the GET request to localhost and the full html in the server response.
Then, the browser loads the app.js javascript and connects to LiveView via WebSocket. Once the websocket connection is established, the browser immediately sends a phx_join message.
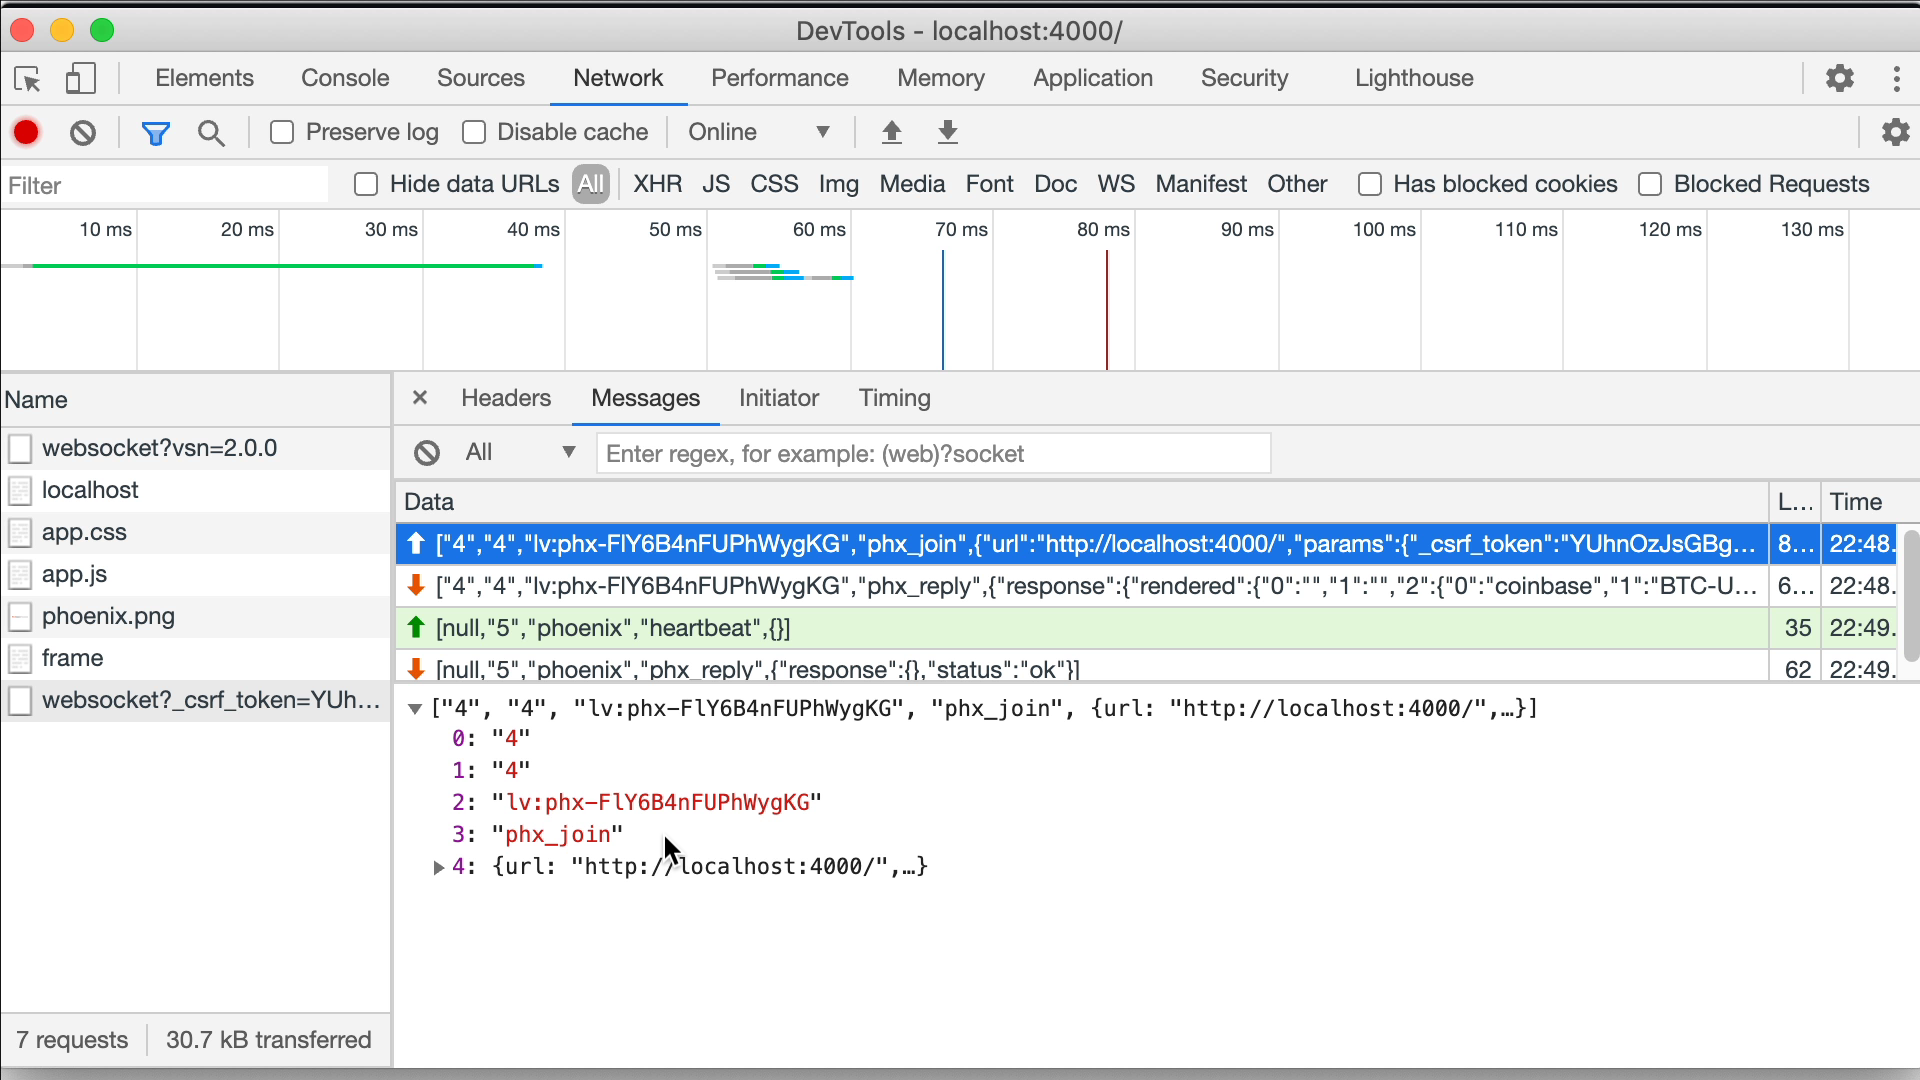
LiveView replies with a phx_reply message containing the rendered view. In this message we don’t find the simple view’s html, instead we find the dynamic values and the static parts of our template. The static parts are kept in the browser’s memory and only the dynamic changes are sent to the browser from LiveView.
[
  ...
  "phx_reply",
  {"response":
  ...
    {
    "0": "coinbase",
    "1": "BTC-USD",
    "2": "2021-01-01 21:48:39.473797Z",
    "3": "29265.33",
    "4": "0.35729453",
    "s": [
      "<p><b>Product</b>:\n  ",
      " -\n  ",
      "\n</p>\n<p><b>Traded at</b>: ",
      "</p>\n<p><b>Price</b>: ",
      "</p>\n<p><b>Volume</b>: ",
      "</p>\n"
      ]
    }
  }
]
To properly render this view, the LiveView JS code running on the browser, simply interpolates the dynamic values with the static parts:
"<p><b>Product</b>:\n  " + "coinbase" + " -\n  " +
"BTC-USD" + "\n</p>\n<p><b>Traded at</b>: " +
"2021-01-01 21:48:39.473797Z" + ...
Ok, but what about the updates?
Let’s remove the comments in mount/3, so that the LiveView process subscribes to get new trades and we can see what happens when socket.assigns is updated.
def mount(_params, _session, socket) do
  IO.inspect(self(), label: "MOUNT")

  product = Product.new("coinbase", "BTC-USD")
  trade = Poeticoins.get_last_trade(product)

  if socket.connected? do
    Poeticoins.subscribe_to_trades(product)
  end

  socket = assign(socket, :trade, trade)
  {:ok, socket}
end
We now have all the elements to understand why we used the if socket.connected? condition. socket.connected? is false during the initial HTTP GET request, in this case we don’t want to subscribe to get new trades because the process is not meant to live after the response; we just want to render the view with the most recent trade and close the connection.
When the browser connects, through a WebSocket, to a stateful LiveView, socket.connected? is true and it’s now time to subscribe the LiveView process to the PubSub topic.
def handle_info({:new_trade, trade}, socket) do
  IO.inspect(self(), label: "NEW TRADE")
  socket = assign(socket, :trade, trade)
  {:noreply, socket}
end
handle_info/2 is called every time the process receives a {:new_trade, trade} message. We print the PID and assign/3 the :trade in the socket. The view gets re-rendered, calling render/1, and the changes are pushed to the browser.
By refreshing the page on the browser we see that, as expected, the view is now correctly updated every time there is a new trade. With the browser inspector we can see the messages sent by LiveView process running on the server.
After the initial phx_join and phx_reply, we find diff messages, which are the changes sent from the server every time a new trade is received.
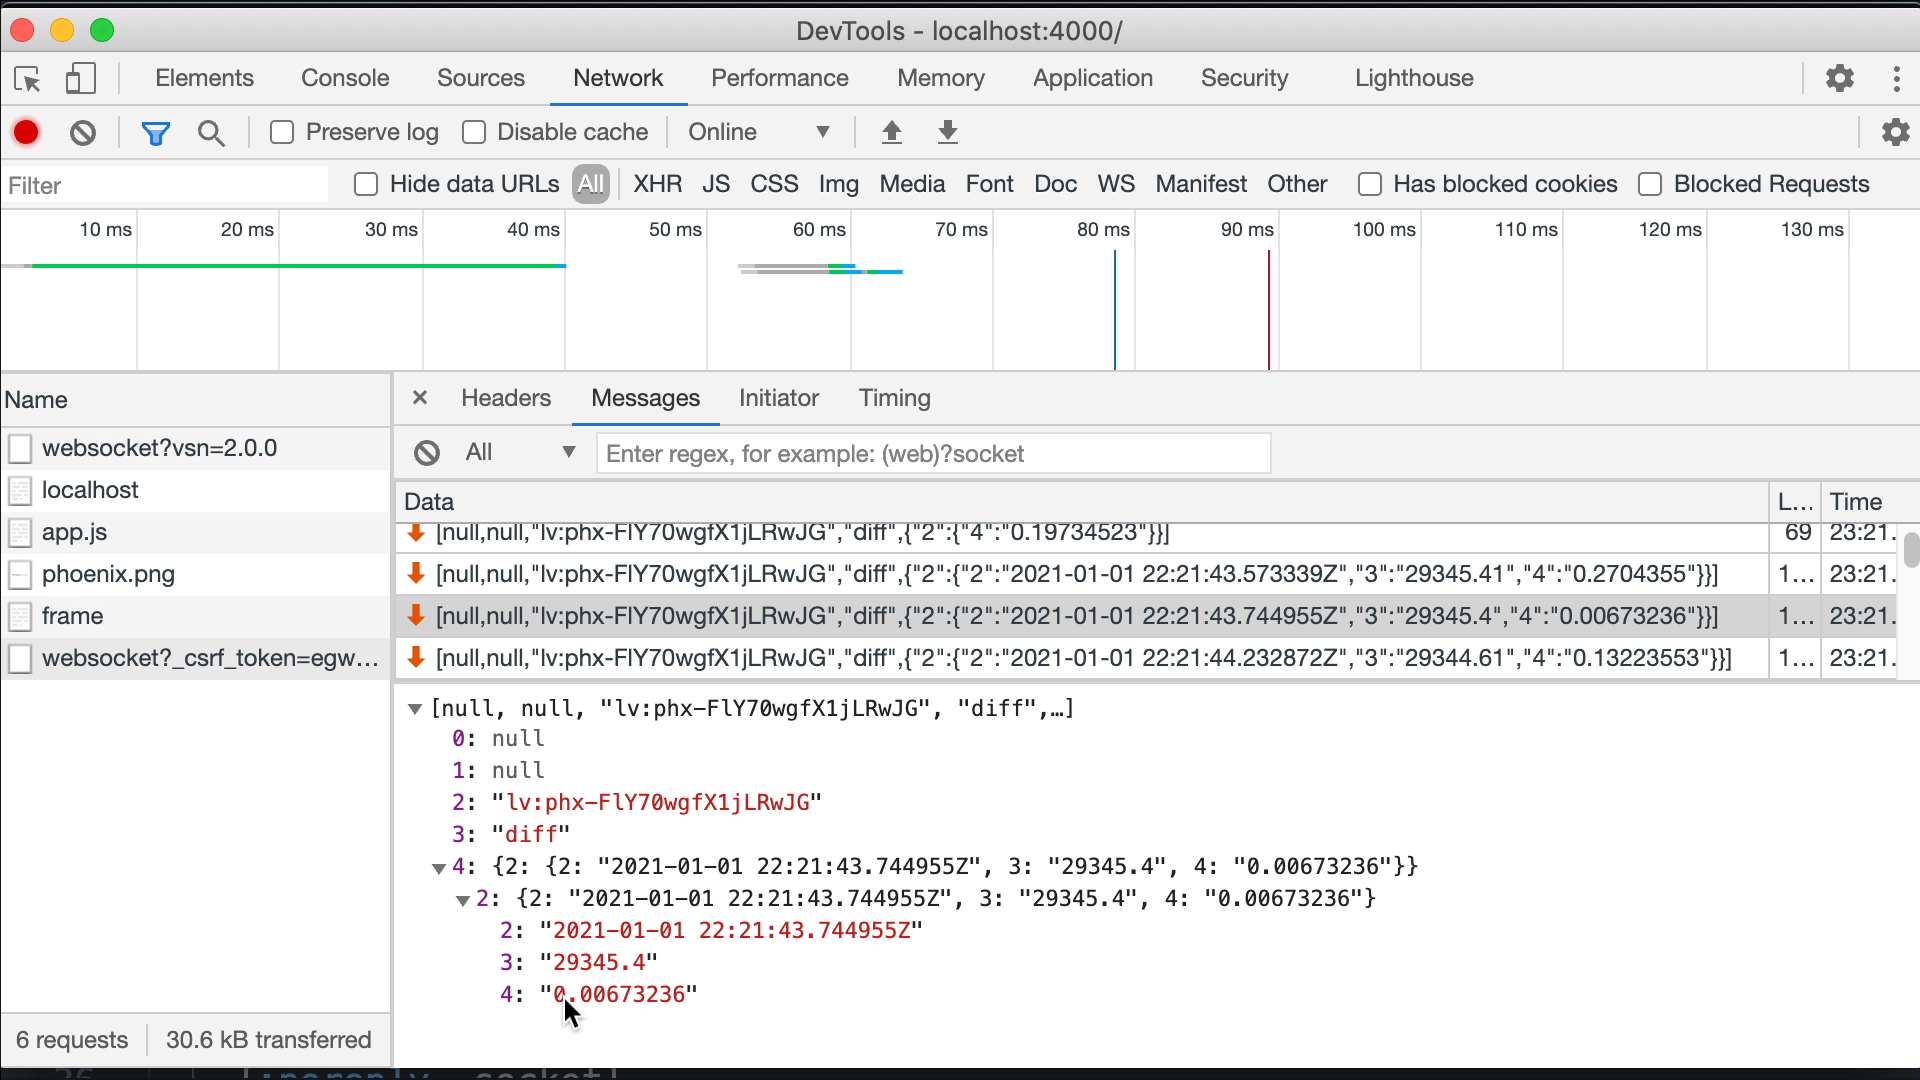
LiveView is able to track the changes and send only the changed values to the browser.
Looking into one of the diff messages, we don’t see any static part, only the dynamic values that changed in socket.assigns. In this way the payload is super compact: we just have the trade.traded_at (position number 2 in the diff message), the trade.price (position number 3) and trade.volume (position number 4).
Each dynamic part has it’s own position number and LiveView uses this positions to know which element needs to be updated in the DOM. The JS code running on the browser applies these changes using a library called Morphdom.
In the terminal we see that each new trade is handled by handle_info/2 which updates the socket, then render/1 is called to re-render the view and send the changes to the browser.
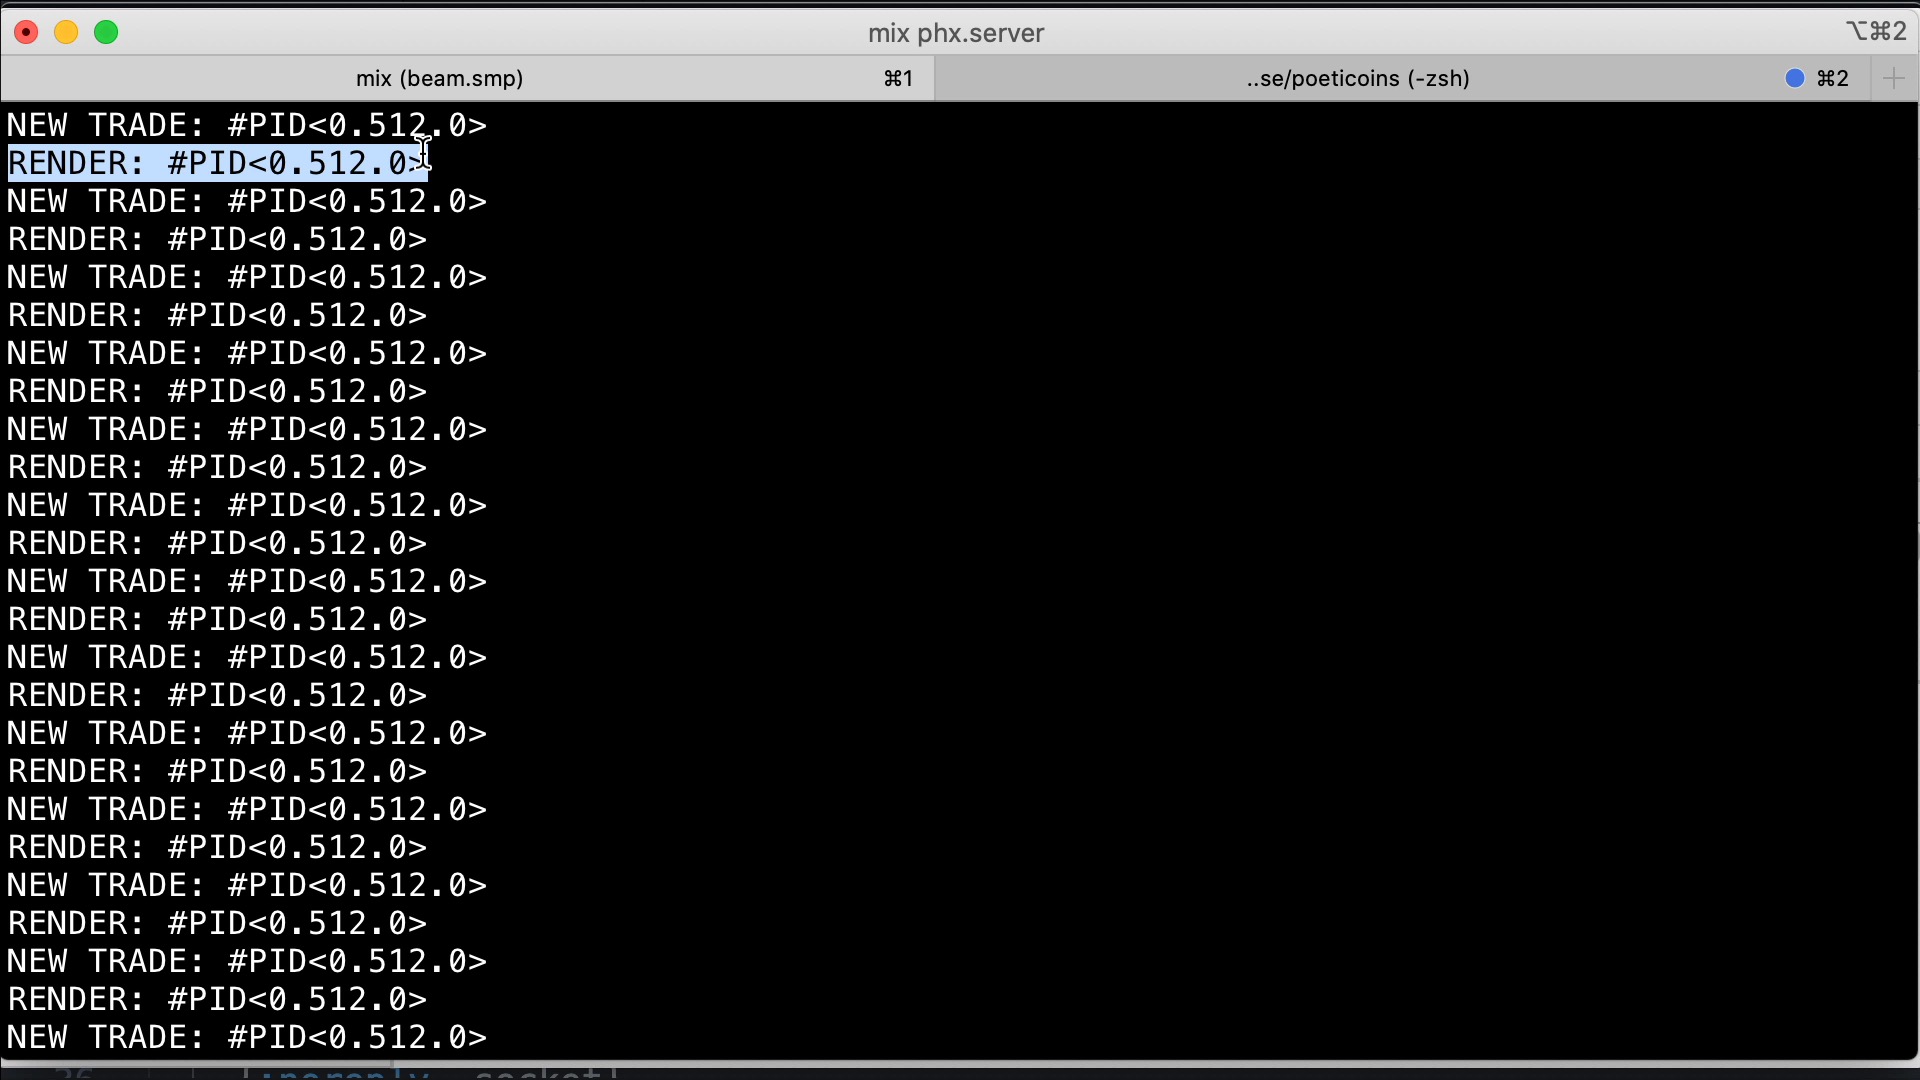
We also see that the LiveView process, which serves our browser, is always the same (one process for each connected user). It’s a single stateful LiveView process, that keeps its state in memory and tracks the changes, as long as we stay connected.
Wrap up
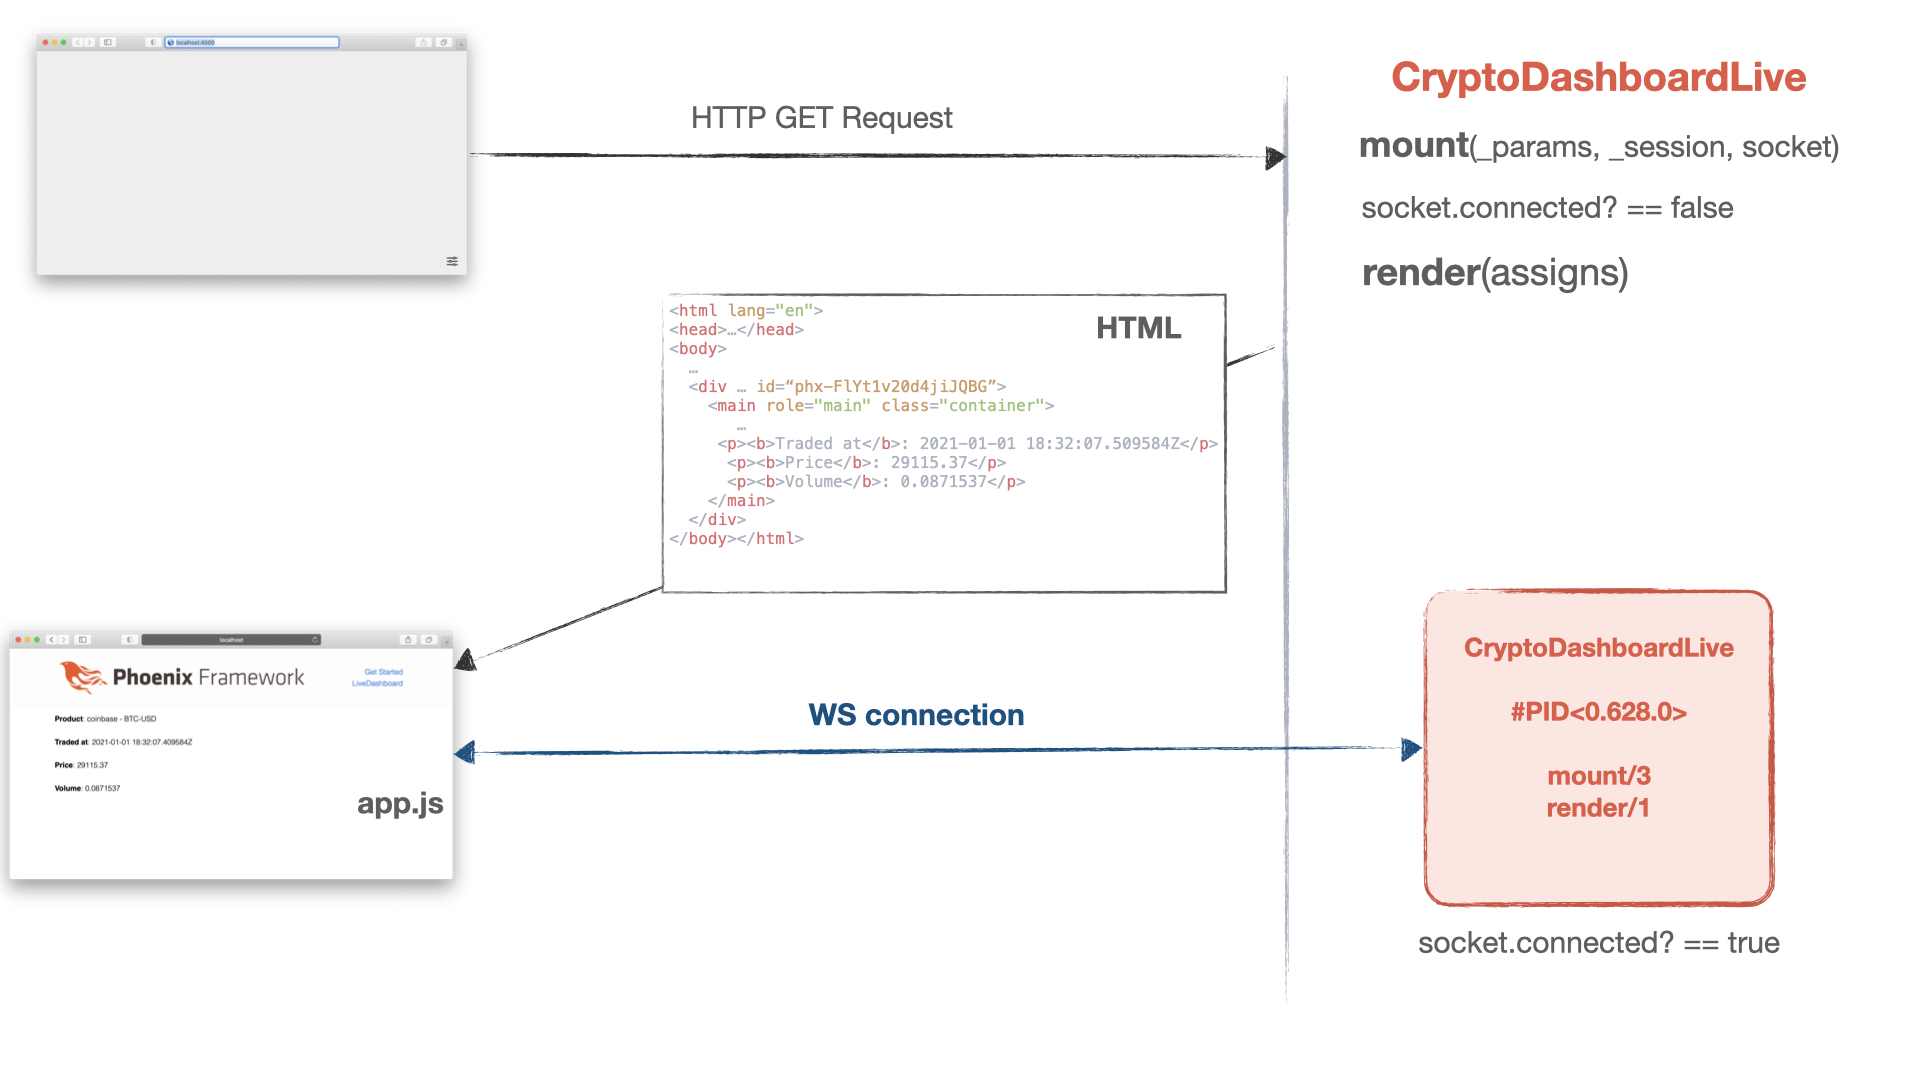
Our browser initially connects to the server making a simple HTTP GET request to the live route. The server calls mount/3 and render/1 callbacks to initialize the data and answer with a fully rendered HTML page. The browser loads the html and the application javascript in app.js, and it connects via WebSocket to the server. Once connected, the server spawns a stateful LiveView process which stays alive as long as we are connected. In mount/3 the LiveView process subscribes to get trade messages.
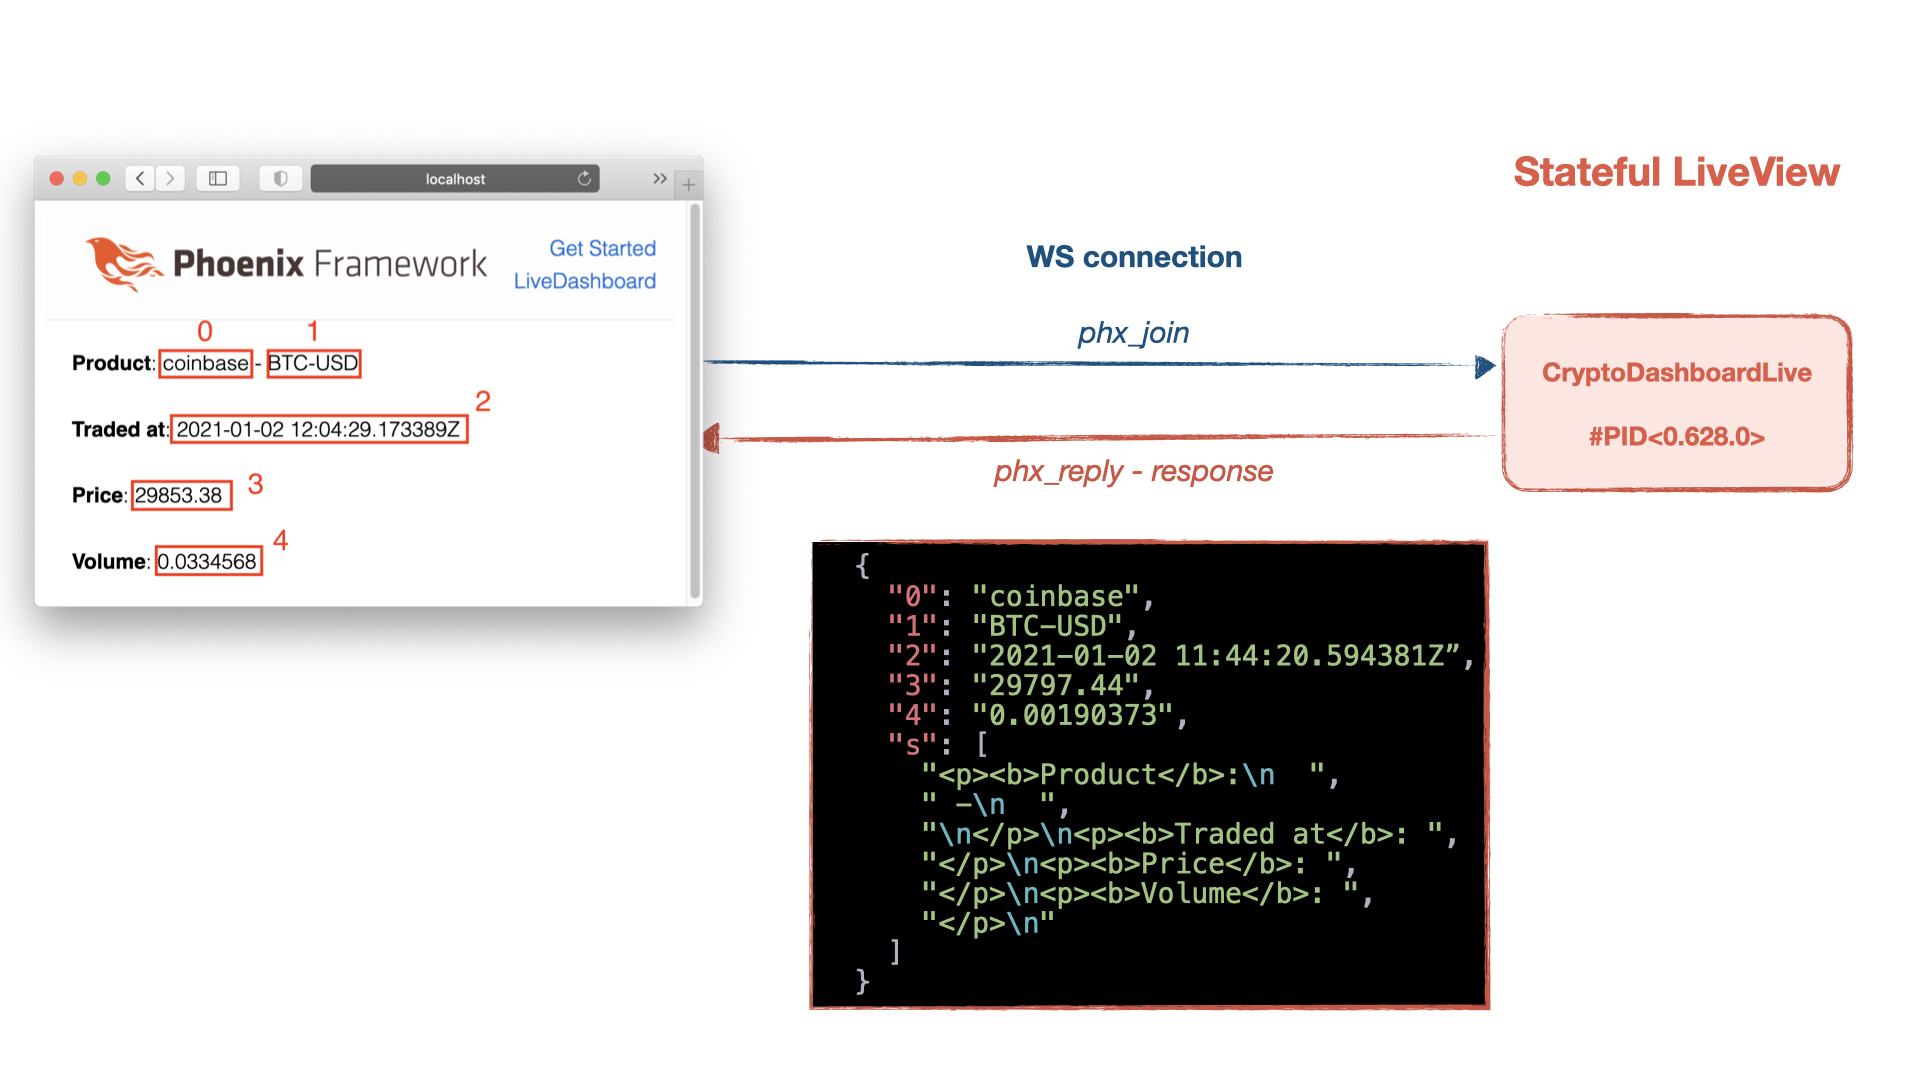
The browser sends a phx_join message and LiveView answers with a phx_reply message in which there is the rendered view, with dynamic and static parts. Each dynamic part has a position.
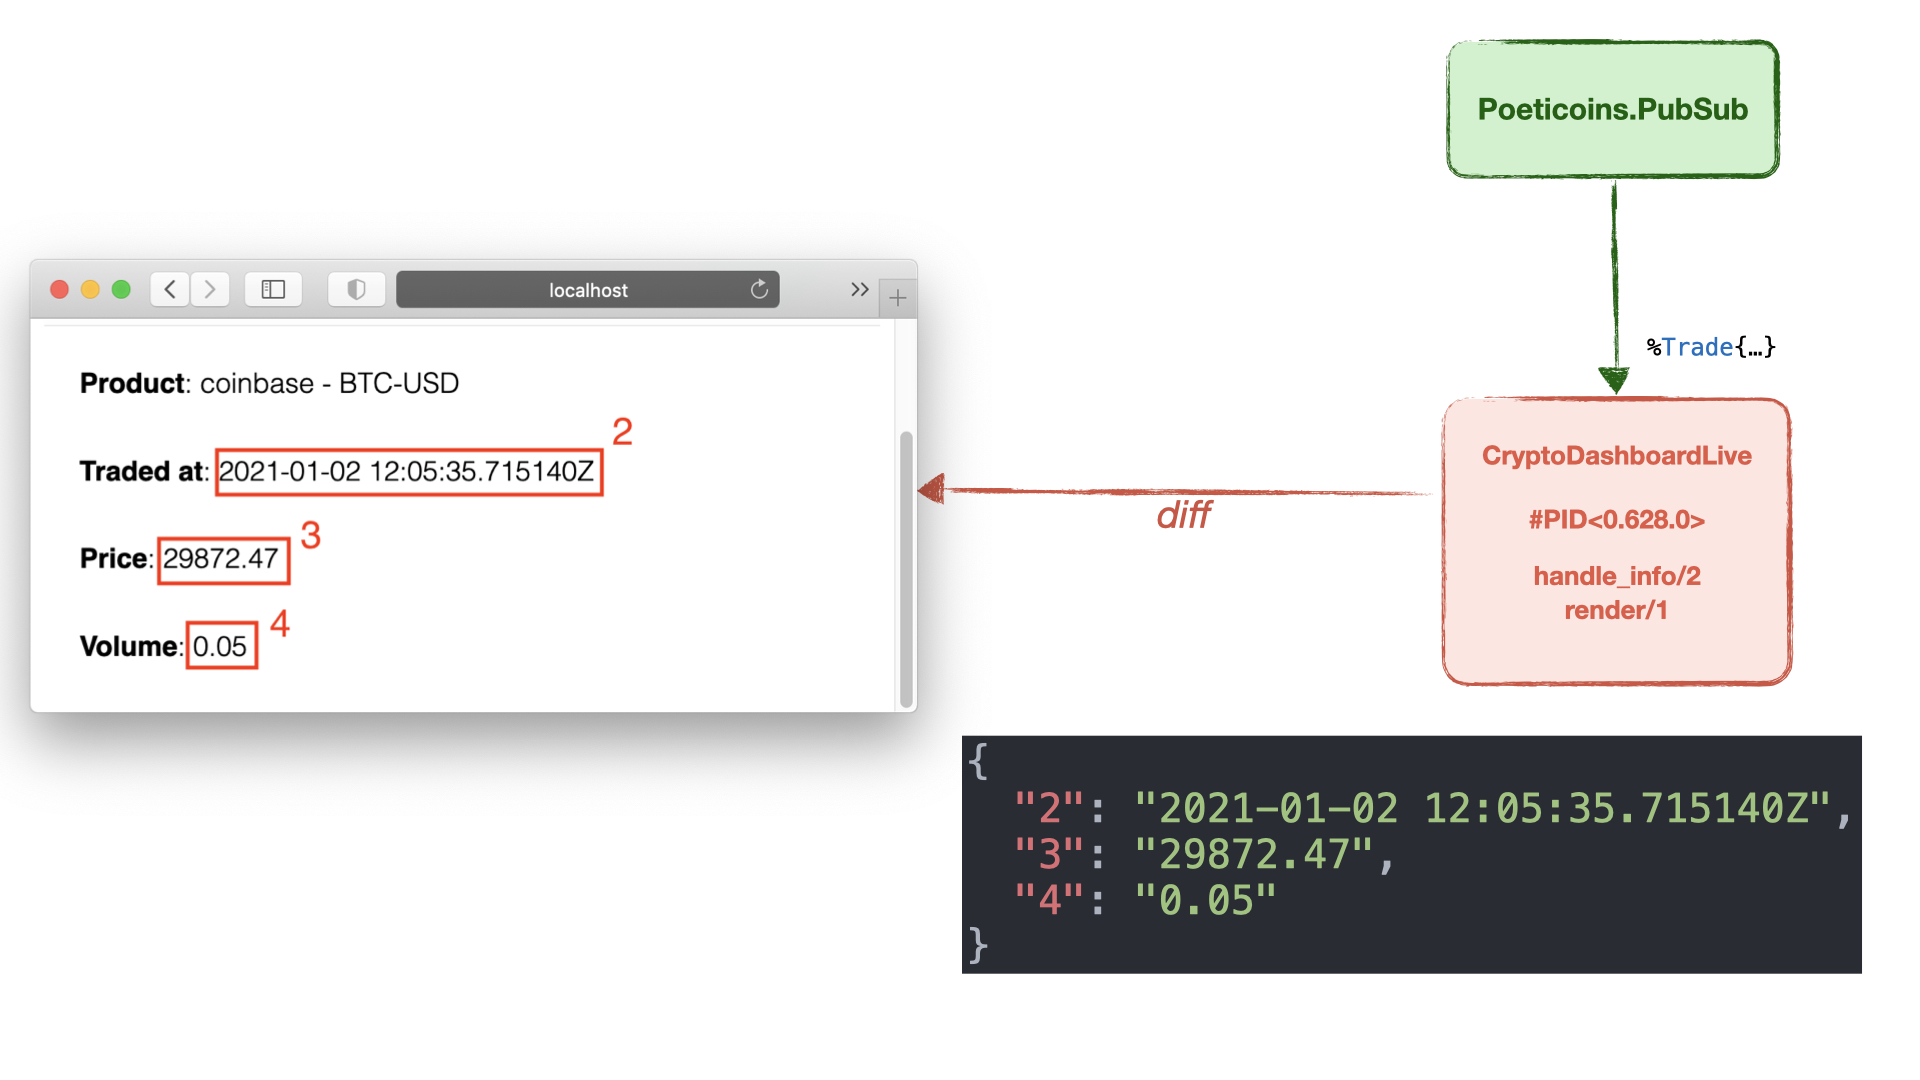
Every time the LiveView process receives a new trade from PubSub, it assign/3 the new trade to the socket and LiveView re-renders the view calling render/1. Only the dynamic values that change are sent to the browser with a diff message, in this way the payload stays super compact. The LiveView JS code running in the browser takes these new values and patches the DOM using the Morphdom library.
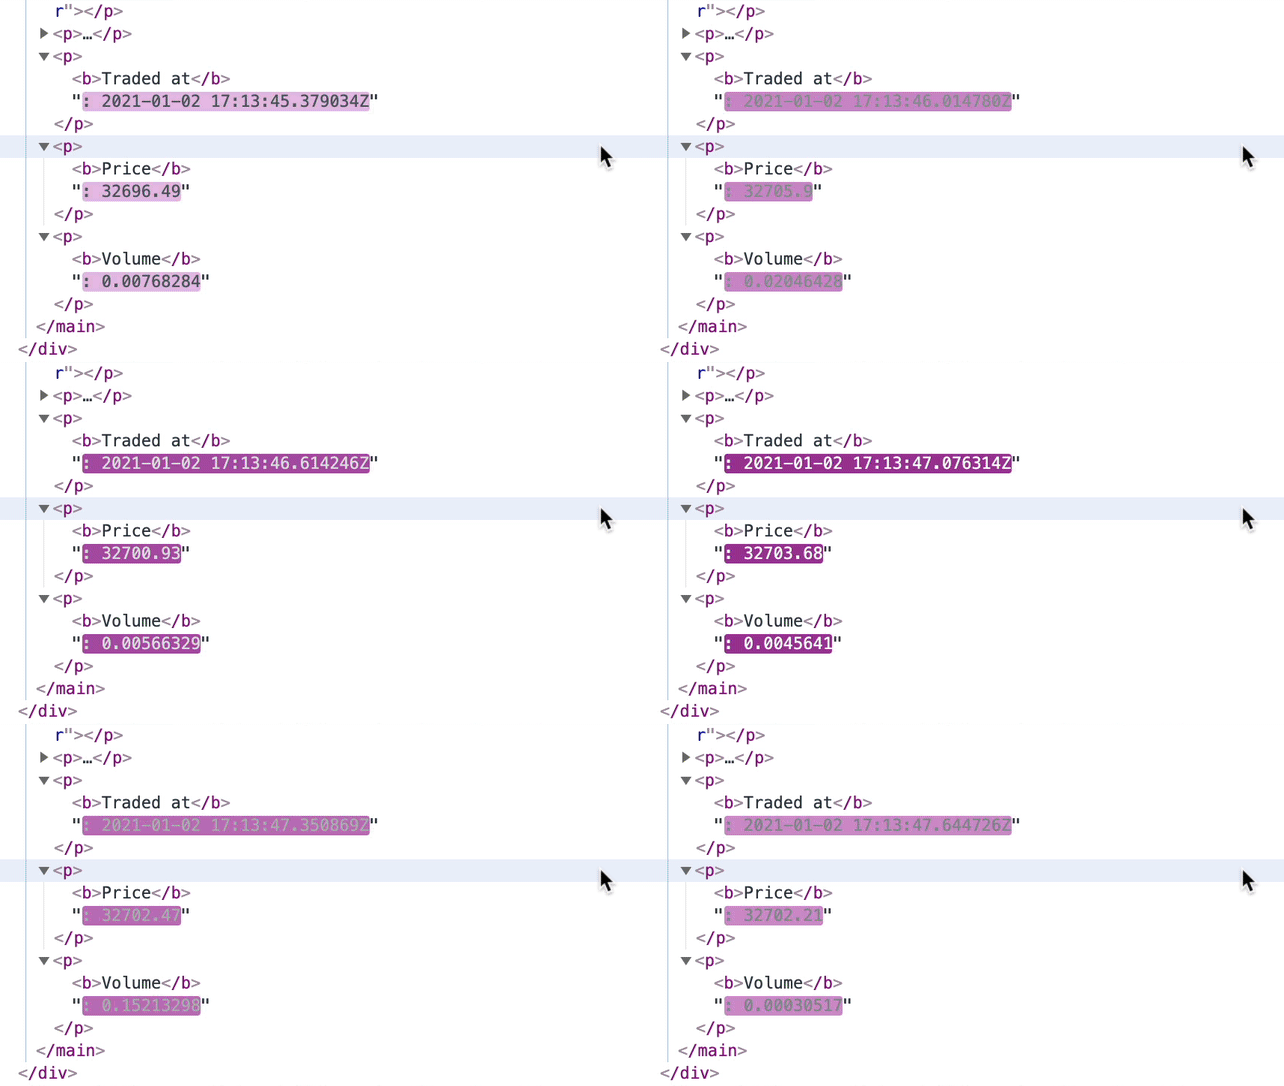
At the moment this view is passive, it only receives new values from the server without any user interaction. In the coming lessons we’ll see how to send events from the browser to the server using buttons, bindings and forms.